Difference between revisions of "Surviving Zombie Survival"
m |
MrDragonorg (talk | contribs) m (MrDragonorg moved page Surviving Zombie Survial to Surviving Zombie Survival: lost "v" letter in the "Survival" word) |
(No difference)
| |
Latest revision as of 08:15, 5 July 2021

Overview
Zombie Survival, ZS, is an Team Deathmatch, survival horror gamemode for Garry’s Mod that features two teams, Zombies and Survivors. Before the game begins Survivors have three minutes to prepare for the zombie invasion, once the timer runs out 14% of survivors closest to the zombie spawn will be forced to volunteer as a zombie. A full game will last approximately 40 minutes.

As the game begins Survivors must endure six waves of increasingly difficult zombie attacks and escape through Sigils in order to win; while zombies have unlimited lives, the survivors only have one life to spare. This tutorial will focus on the basis of surviving as a human.
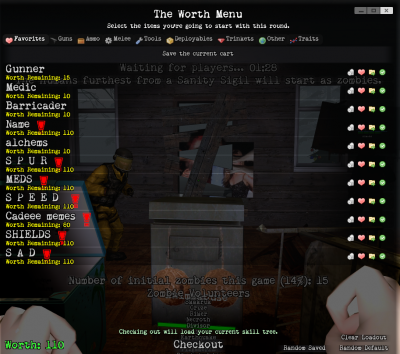 Part 1: Proving your worth with The Worth Menu

Once you spawn in as a human during preparation you will be first provided with a menu called The Worth Menu. In this menu, you will be given 100 worth points to buy out your beginning loadout. Choose wisely however, for once you have checkout of The Worth Menu, or if the round is starting, you will no longer be able to buy again from the menu.
Note, some skills like Worthiness can help increase the amount of worth given in exchange to starting with negative point profit. Also, if you had accidentally closed out the menu simply press (F2) to bring it back up.
 |
.png) |
| Example of Worthiness 1 providing +5 extra Worth for -3 starting Points. | Example of a Worthiness 2 providing +10 extra Worth for -6 starting Points. |
Part 2: Setting shop supporting Sigil Square


Although Sigils are win conditions humans must defend to win, it will be nigh impossible to save them all in the end. When attempting to find the perfect sigil one must determine the many negative factors:

- ”Are you required to run back and forth to every entryway?”
If so, the sigil will be extremely difficult to defend and may soon be destroyed later should the zombies decide to nest switch, for the moment nests are made zombies will instantaneously spawn on top of it allowing them to attack an unguarded entryway for a few seconds; enough time for a mass horde to demolish the barricade.
- Exclusionary: Having line of sight to all the entryways whilst staying in the middle of conflict is vital towards defending a sigil room that helps prevent the 'Nest switching' strategy becoming soundproof for zombies, for survivors can instantly know where which location the zombies would be attacking just by the sudden drop in zombie activity in one entryway to the sudden increase to another, while being able to only point and shoot and not unnecessarily run towards said entryway.
- “Is the sigil room spacious?”
If not, then expect the sigil to fall in the last couple of waves. As though the common belief is to barricade sigil rooms with one entryway because of chokepoints, one must take consideration to what props the Barricader is forced to use in that scenario. This will create a situation of the sigil room falling due to the barricader being forced to use small props, and lack of space to make layers for the barricade.
| Good sigil room example | Bad sigil room example |
|---|---|
 |
 |
| Notice the table props in the corner not touching the ceiling, indicating how the Barricader has enough height to establish as many layers needed to make a successful barricade. | Notice the Supply Crate sigil taking a quarter width of the closet room, demonstrating how most common foundation props like the blue shelving cabinets won't fit into the closet sigil, yet alone deployables like the Remantler taking more barricading space in the already cramped room. |
If you’ve never encountered any of these negative factors then you may have found the perfect sigil to defend and may be able to win the game, but remember perfect sigils can fall as well if there’s no one willing to defend it.
Part 3: Picking fights on your own size

As stated before, humans only have one life to spare, meaning you must precisely decide when and where to attack the zombies, or die a quick horrific death. Follow these simple guidelines on whenever not you should attack those zombies:
- Pay attention to your surroundings.
Most zombies will hide in dark corners and attack when close to humans, always stick to lighted areas and if you’re expected to be ambushed move to the otherside of the zombie and attack from there whilst moving backwards for extra breathing room. Stick together in groups and occasionally focus on your Fear-o-Meter, for it will help in determining if there are zombies in the nearby area. Note: Wraiths will not be picked up on your Fear-o-Meter due to their role as an invisible ambush class.
- Watch out for loose props.
Zombies can attack through a mechanic called Propkilling. Propkilling is a uncommon attack in which zombies can hurl objects at deadly force, either immobilizing humans for a few seconds, or outright instantly killing humans.
.png)
- Always look at the wave counter and scoreboard.
After wave 1 every time a new wave begins, zombies are granted a player controlled zombie boss, do not attempt to take down the boss unless you’re in a group or can outrun it. Holding down the (Tab) key shows the scoreboard, the scoreboard not only provides info on how many points the survivor team have but also what type of zombies are out there in the field. This is extremely useful during intermission time, for you can determine if there are still active zombies or harmless spectator crows; in the latter, you will be free from harm and be able to scavenge loot off of dead survivors.
- Be aware of your current Status Effects.
It is vital to always check your well being every so often as most zombies have the ability to give you debilitating weaknesses that can drastically lower your chances of survival. Examples such as;Sickness lowering health gains by 20% and prevents you from eating any food item causing you to bleed out or die from poison, and
Enfeeble increases all damage taken sources by 40%. While if a survivor has lethal amounts of
Poison and
Bleed and there’s no medics around one can either buy Antidotes on removing poison, or Bandages to remove the bleeding and
Wounds.

However, survivors such as medic mains have the potential to give you buffs that can heavily increase your chance of survival. Examples like Cleanse that absorbs all forms of Sickness, ![]() Defense lowering all damage taken by 30%, and
Defense lowering all damage taken by 30%, and ![]() Strength increasing all damage given by 25%
Strength increasing all damage given by 25%
- Addendum: Skills like Haemostatis located in the Health Tree can help survivors resist all forms of debuffs in exchange to spending current Blood Armor on them, useful if one is using a melee weapon to start the 'Leeching' buff into absorbing more Blood armor from recently hit zombies.
 Conclusion
The entire concept of ‘Surviving in Zombie Survival’ is essentially determining if one is able to fully understand and overcome unforeseen situations folded in place after every round. While keeping in mind that the only way to win is work together as a team, or else this tutorial will be all for naught.
 Credits
zmains/humains, why can't we be allmains :l 08:57, 3 July 2021 (UTC)Kingazteca A.K.A BraisedNuggets -Creator of the wiki article.