Difference between revisions of "Navmeshing"
MrDragonorg (talk | contribs) |
MrDragonorg (talk | contribs) |
||
| Line 8: | Line 8: | ||
The better navmesh is created, the more powerful the bots will be, since they will know how to act in each area of the map. A good navmesh also affects the optimization, server network and is especially necessary for the correct work of [[The Undead|Great Evils]] - exclusive zombie boss classes only for bots. | The better navmesh is created, the more powerful the bots will be, since they will know how to act in each area of the map. A good navmesh also affects the optimization, server network and is especially necessary for the correct work of [[The Undead|Great Evils]] - exclusive zombie boss classes only for bots. | ||
<!-- | |||
| Line 21: | Line 22: | ||
--> | |||
== Terminology == | == Terminology == | ||
| Line 103: | Line 103: | ||
! scope="row" style="width: 13%;" | <span style="color:orange">Flags</span> | ! scope="row" style="width: 13%;" | <span style="color:orange">Flags</span> | ||
| style="width: 10%;" | [[File:Navmesh menu flags.png|frameless|center|upright=0.58]] | | style="width: 10%;" | [[File:Navmesh menu flags.png|frameless|center|upright=0.58]] | ||
| Ghost Mode – Gives you noclip. | | <span style="color:teal">'''Ghost Mode'''</span> – Gives you noclip. | ||
Hide Air Paths – Hides air nodes. | <span style="color:teal">'''Hide Air Paths'''</span> – Hides air nodes. | ||
Hide Sublevel Paths – Disables the visibility of nodes you cannot see. | <span style="color:teal">'''Hide Sublevel Paths'''</span> – Disables the visibility of nodes you cannot see. | ||
Draw Through Walls – Enables drawing nodes through walls. | <span style="color:teal">'''Draw Through Walls'''</span> – Enables drawing nodes through walls. | ||
|} | |} | ||
| Line 115: | Line 115: | ||
'''''Let's consider these options in more details.''''' | '''''Let's consider these options in more details.''''' | ||
== Path edit mode == | == Path edit mode == | ||
[[File:Path edit mode.png|frameless]] | |||
=== Create Node === | === <u>Create Node</u> === | ||
<!-- | |||
This mode allows you to create nodes and select types of nodes. | This mode allows you to create nodes and select types of nodes. | ||
Control: | Control: | ||
| Line 136: | Line 138: | ||
No Auto-Path – Creates a node that will not automatically connect to other nodes | No Auto-Path – Creates a node that will not automatically connect to other nodes | ||
=== Node Types === | === <u>Node Types</u> === | ||
Regular regularnode_example.jpg A common node type that allows bots to walk between them and automatically connects to all visible nodes. | Regular regularnode_example.jpg A common node type that allows bots to walk between them and automatically connects to all visible nodes. | ||
No Auto-Path noautopathnode_example.jpg A common node type, but will not automatically connect. This kind of node must be connected using the “Edit ReachSpecs” option, which will be discussed below. | No Auto-Path noautopathnode_example.jpg A common node type, but will not automatically connect. This kind of node must be connected using the “Edit ReachSpecs” option, which will be discussed below. | ||
| Line 182: | Line 184: | ||
[[Bug icon]] Bug: Sometimes with water nodes bots can float up to the ceiling, causing them to get stuck. This is very important for underwater caves like zs_obj_enervation_v22. It is recommended to use “areas” for the water. | [[Bug icon]] Bug: Sometimes with water nodes bots can float up to the ceiling, causing them to get stuck. This is very important for underwater caves like zs_obj_enervation_v22. It is recommended to use “areas” for the water. | ||
=== Edit ReachSpecs === | === <u>Edit ReachSpecs</u> === | ||
With this mode you can change paths ("links") between nodes. For example, you can delete the path from one node to another or completely disconnect the nodes, as a result of which the bots will either be able to go to this node, but will not be able to return, or, accordingly, will not move between these nodes at all. It also allows you to create special paths between nodes, for example, fast jump paths or teleport paths. | With this mode you can change paths ("links") between nodes. For example, you can delete the path from one node to another or completely disconnect the nodes, as a result of which the bots will either be able to go to this node, but will not be able to return, or, accordingly, will not move between these nodes at all. It also allows you to create special paths between nodes, for example, fast jump paths or teleport paths. | ||
Regular nodes automatically create paths between themselves, but sometimes they may not be correct, so this is an extremely useful tool to edit them. If there are a lot of nodes, it will often be easier to use “Create nodes + Path draw distance”. This will be discussed later. | Regular nodes automatically create paths between themselves, but sometimes they may not be correct, so this is an extremely useful tool to edit them. If there are a lot of nodes, it will often be easier to use “Create nodes + Path draw distance”. This will be discussed later. | ||
| Line 209: | Line 211: | ||
editreachspecs_exampleingame.gif (mp4) | editreachspecs_exampleingame.gif (mp4) | ||
=== Path Types === | === <u>Path Types</u> === | ||
editreachspecs_flags.png | editreachspecs_flags.png | ||
Flying flyingpath_example.jpg Used for flying classes. Not needed as there are currently no flying classes for bots. | Flying flyingpath_example.jpg Used for flying classes. Not needed as there are currently no flying classes for bots. | ||
| Line 236: | Line 238: | ||
Water path waterpath_example.png Automatically created for water nodes. | Water path waterpath_example.png Automatically created for water nodes. | ||
=== Edit Nodes === | === <u>Edit Nodes</u> === | ||
A mode that allows you to replace a node to another location while saving paths for it. It must be used carefully, otherwise some of the saved paths may go through the wall. | A mode that allows you to replace a node to another location while saving paths for it. It must be used carefully, otherwise some of the saved paths may go through the wall. | ||
| Line 255: | Line 257: | ||
editnodes_exampleingame.gif (mp4) | editnodes_exampleingame.gif (mp4) | ||
=== Volumes === | === <u>Volumes</u> === | ||
Allows you to create playerclip (invisible walls), trigger_hurts, etc. brushes. An extremely useful tool when used correctly. | Allows you to create playerclip (invisible walls), trigger_hurts, etc. brushes. An extremely useful tool when used correctly. | ||
volume_navmesh_example.jpg | volume_navmesh_example.jpg | ||
| Line 289: | Line 291: | ||
volumes_types.png | volumes_types.png | ||
=== Nav Mesh === | === <u>Nav Mesh</u> === | ||
Allows you to create and edit "areas" - a special type of navmesh that is fundamentally different from nodes. Instead of placing multiple nodes in a room, you select space for the bots to navigate. | Allows you to create and edit "areas" - a special type of navmesh that is fundamentally different from nodes. Instead of placing multiple nodes in a room, you select space for the bots to navigate. | ||
navmesh_area_example.jpg | navmesh_area_example.jpg | ||
| Line 324: | Line 326: | ||
More specific examples of creating navmesh using areas will be described below. | More specific examples of creating navmesh using areas will be described below. | ||
=== Settings === | === <u>Settings</u> === | ||
Used only by developers or SA. | |||
Used only by developers or SA. | |||
== Path Draw Distance == | == Path Draw Distance == | ||
| Line 442: | Line 445: | ||
https://youtu.be/LLGLuRNalYE - Areas navmeshing | https://youtu.be/LLGLuRNalYE - Areas navmeshing | ||
https://youtu.be/82vNoRpGTCs - Areas navmeshing | https://youtu.be/82vNoRpGTCs - Areas navmeshing | ||
--> | --> | ||
__NOEDITSECTION__ | __NOEDITSECTION__ | ||
Revision as of 18:22, 1 September 2020
Navmeshing – the process of creating navigation for bots, or more simply, creating paths so that bots can work correctly on a given map. There are many different types of bots that are used for the zs gamemode: AzBots, D3Bots, MarcoBots, etc.
MarcoBots are currently used on Sunrust servers. MarcoBots are not open-source bots, they are private and exclusive type of bots and you cannot download them for your single player. Therefore, the navmesh creation takes place on a dedicated server (or directly in the main server itself).
The advantages of MarcoBots is the simplicity navmesh creation, the automation of many bot actions, since you don’t need to specify when they need to jump or crouch, and a huge level of optimization, as a result these bot load server much less and this leads to less lags.
The better navmesh is created, the more powerful the bots will be, since they will know how to act in each area of the map. A good navmesh also affects the optimization, server network and is especially necessary for the correct work of Great Evils - exclusive zombie boss classes only for bots.
Terminology
| Navmesh (abbreviated "mesh") |
Navigation for bots. |
|---|---|
| Navmeshing | The process of creating navigation for bots. |
| Nodes | Points between which bots move and where they can find you. |
| Paths (or "links") |
Connections between nodes that allow or not move between specific nodes. |
| Areas | A special type of bot navigation that differs from nodes. Instead of nodes, you select the required area and the bot can find you if you are in it. Will be discussed this type of navigation in more detail below. |
| Targeting | A bot pathfinding for the closest or highest priority target. |
| Pursuit mode | The bot stops moving on the nodes and starts moving exactly behind you, is activated for ~200 units. |
Required commands and control
To be able to create navmesh, you need to be granted access to a dedicated navmesh server. Contact Scott to have access to dev server: Scott#3224. After obtaining the necessary rights, you can connect to it and begin to create navmesh.
Dev Server IP: 104.194.10.86:27020
Next, you need to get the navmesh tool and start creating the navmesh. Let's look at the required commands for this:
| /navmeshtool | Gives you a navmesh tool |
|---|---|
| /startmeshing | Gives you a navmesh tool, god mode and an infinite wave time |
| /changemapnavmesh mapname |
Allows you to change the map on server |
| zs_admin_purgepaths | Completely clears navmesh (SA only,console command) |
| /give weapon_zs_adminpathtool PlayerName |
Alternative way to get navmesh tool (SA only) |
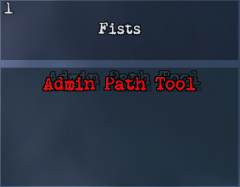
After you give yourself a navmesh tool, you may notice control tips in the upper left corner.
Disable the experience display in the options in “F4 –> Interface” to see them more correctly. If you also have spark_currency_widget 1, disable it as well.
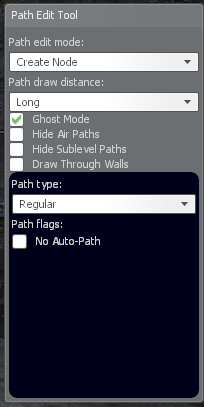
When you hold down the “Alt” key. in the lower right corner, a menu for tool control will appear. Consider this interface:
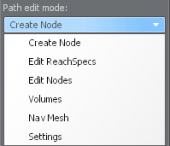
| Path edit mode | Allows you to select the navmesh type. Will be discussed in more detail below. | |
|---|---|---|
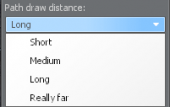
| Path draw distance | Allows you to change the display range of nodes | |
| Flags | Ghost Mode – Gives you noclip.
Hide Air Paths – Hides air nodes. Hide Sublevel Paths – Disables the visibility of nodes you cannot see. Draw Through Walls – Enables drawing nodes through walls. |
Let's consider these options in more details.
